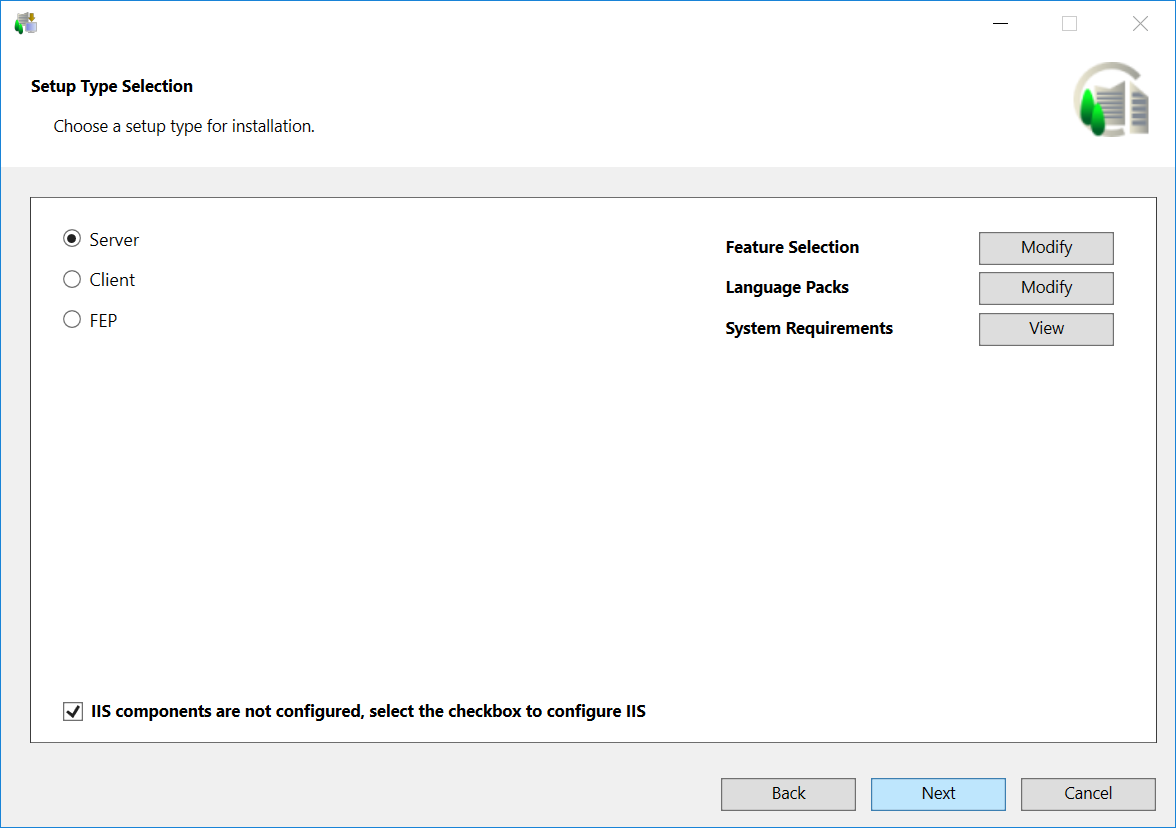
Select a Setup Type for Installation
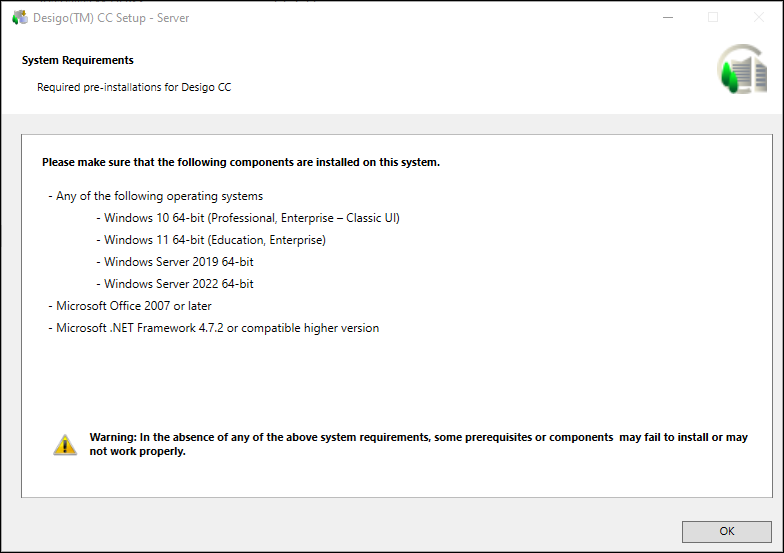
- In the Setup Type Selection dialog box that displays, click View adjacent to System Requirements. Verify that the computer has all listed software in the System Requirements dialog box.
- In the Setup Type Selection dialog box click Next to proceed with the default feature selection and the default language pack selection for the default Setup type - Server.
- Change the default Setup type to select Client/FEP. Changing the Setup type provides you with set of extensions and prerequisites applicable for the selected Setup type.
- Next to Feature Selection, click Modify.
- A list of all extension suites along with the extensions that can be installed on the server displays. Note that the mandatory extension and its parent extension (mandatory or non-mandatory) are not displayed for selection/deselection in the Feature Selection dialog box. However, they are listed later in the Ready to Install the Program dialog box and are always installed.

An asterisk (*) displays next to the extension that are IEC62443-4-2 certified in the Feature Selection dialog box.
If all mandatory and non-mandatory extensions are IEC certified, a message "Platform and EMs (*) adhere to the IEC 62443-4-2 standard" displays in the Feature Selection dialog box.
If any of the mandatory extension is not IEC certified, a message “EMs (*) adhere to the IEC 62443-4-2 standard” displays in the Feature Selection dialog box.
If any of the non-mandatory extension is not IEC certified, a message "Platform adheres to the IEC 62443-4-2 standard" displays in the Feature Selection dialog box.
- Click Add EM to select and add extensions that are available at another location other than the Installation media from a valid path ....\EM\[EM Name] using the Browse For Folder dialog box.
When you select EM folder, all extensions available in this folder are included in the installation. If you select a single extension, make sure to select its parent extension, otherwise, the newly selected extension (child) cannot be added and a warning displays.
The Installer detects and adds the language pack for the newly added extension if Languages folder is kept parallel to the EM folder.
It also automatically adds the extension suite for the selected extension, if the extension suite is not listed. - Deselect all extension suites/modules that you do not want to install. Selecting or deselecting an extension automatically deselects all the dependent extensions.
- Click OK to return to the Feature Selection dialog box.
- Click OK to return to the Setup Type Selection dialog box.
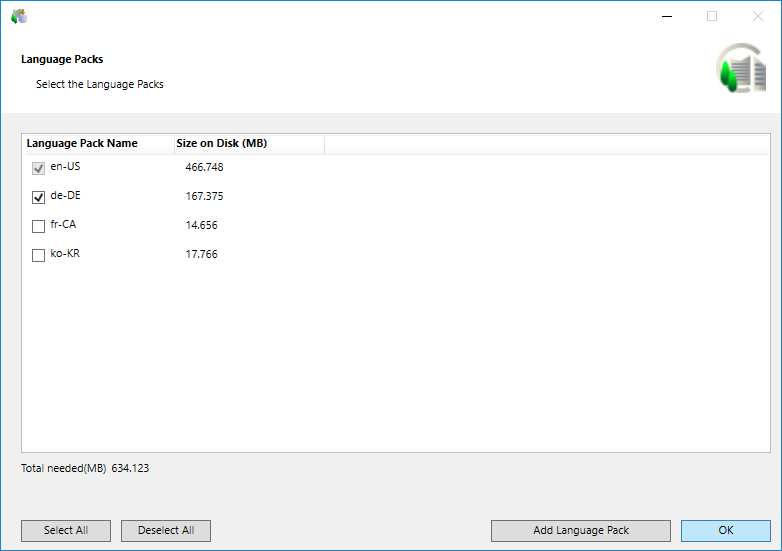
- Next to Language Packs, click Modify.
- All the language packs available in the Languages folder located at the path …\InstallFiles on the distribution media are listed.
- Select the language packs that you want to install.
NOTE 1: To select more language packs for installation from another location or media, click Add Language Pack. (See Language Packs and the List of Supported Languages in the current version of Desigo CC )
NOTE 2: All required language packs must be installed before a customer project is created. Once the customer project is created, you can install additional language packs. However, you cannot add them to the available project languages. For add a newly added language pack, you need to create another project. - (Optional and required only when you want to install and configure IIS on the selected setup type) Verify that the checkbox for IIS configuration is selected by default. Alternatively, deselect it to skip IIS installation.
The checkbox displays only when no IIS component is installed. Thus, the configuration of IIS settings are automated during installation only when no IIS settings are configured already.
However, if any IIS component is already installed, a warning message displays informing you to manually configure IIS. (see Manually Install and Configure IIS on Different OS Types in Additional Installer Procedures). Installer does not automatically identify and complete the missing IIS components during installation.
If all required IIS components are already correctly installed and configured, an info message displays and you can proceed with installation.
NOTE: In case when no IIS components are configured but ARR is installed and enabled, installer displays a warning message and once the installation along with IIS configuration is completed you need to uninstall existing ARR and re-install ARR and enable it. For more information, see Install Application Request Routing (ARR) in Manually Install and Configure IIS on Different OS Types > Additional Installer Procedures. - Click OK.