Distribution Participants Expander

The Distribution Participants expander is enabled when you select the Distribution participant check box, that in turn enables the distribution.

It provides all the required configuration parameters for setting up the projects in distribution. You can set up the projects in distribution on the same (single) server as well as on a different server. The distributed systems that you set up can be fully meshed or hierarchical.

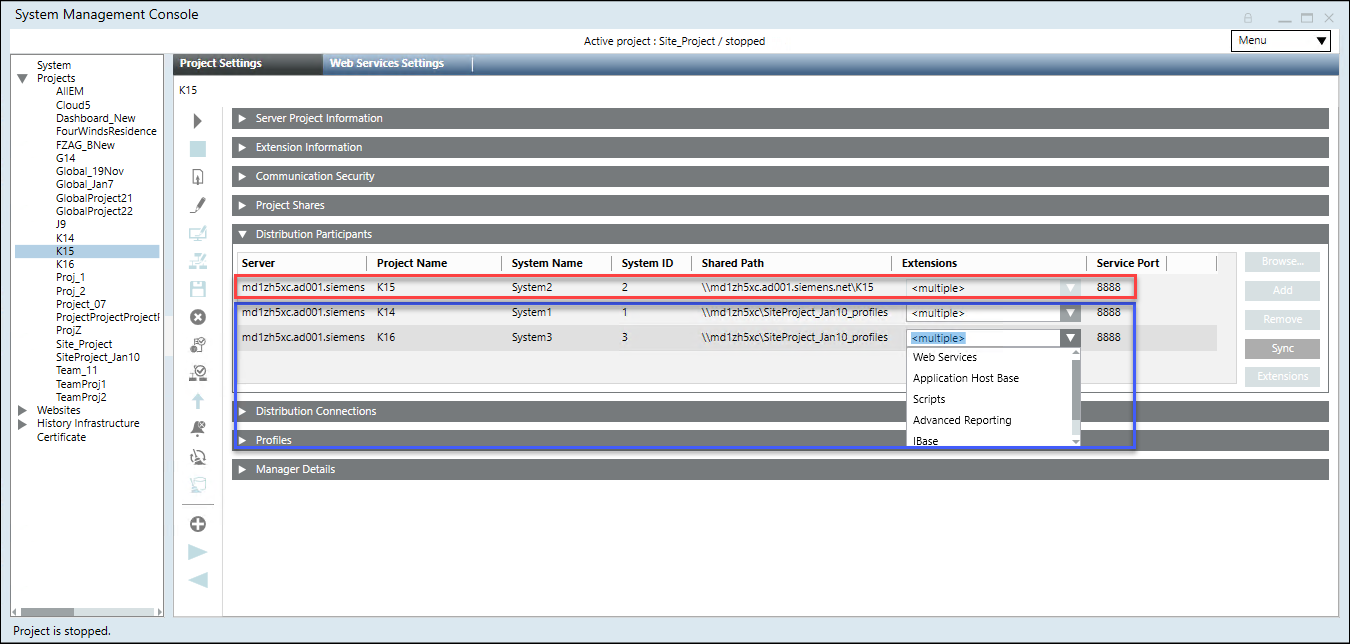
When you enable the distribution, a default and very first entry for the Local System (Originator) is added. This entry includes the details of the current project configuration including the current Server Name, Server Project name, System Name, and so on. This is a read only entry. You can neither edit the details of Local System entry nor delete it.

Using the Distribution Participants expander you can configure the distribution participants (projects) available on the same Server or from other Server. You can do this in two ways:

Automatic Mode

When you click the Browse button in the Distribution Participant expander for adding the distribution partner entry, you are working in automatic mode. This is because, once you select the project on the selected Server from the domain/workgroup, all the configuration details of the selected project including the extensions are automatically added as a distribution partner project’s entry in the Distribution Participants expander.

Manual Mode

When you click the Add button in the Distribution Participants expander for adding the distribution partner’s entry, you are working in manual mode. In manual mode, you need to provide all the configuration details of the distribution partner project. You can add the extensions for the distribution partner project using Extensions.

NOTE:
While working in distribution environment in manual or automatic mode, make sure that the distribution partner project’s details including Server name, project name, system name, system ID, the shared path, and the extensions configured in the selected project are valid. Otherwise, the distribution does not work.
For example, if the extensions are incorrectly configured when working in manual mode, the corresponding profiles will not be present on the originator (Local) system; therefore, you cannot to load the corresponding application for the profile.

The Distribution Participants expander comprises of following:

Distribution Participants Expander

Item

Description

Server

Allows you to type in the name of the Server computer or IP address of the distribution participant when you click Add and work in the manual mode.
Allows you to add the Server name in the Automatic Mode. To do this, click Browse to select the Server computer from the accessible networks in the domain/workgroup using the Browse for Distribution Partner dialog box.

Project Name

In the manual mode, type in the name of the project on the selected Server that you want to set up in distribution.
In automatic mode, click Browse, select the projects enabled for distribution on the selected Server. The distribution partner project’s entry along with the Project Name field is automatically added once you select the project and click Add Distribution Partners.

System Name

In manual mode, type in the system name configured in the selected project on the selected Server in manual mode.
Alternatively, click Browse to work in automatic mode and the system name is automatically added in the distribution participants entry once you select the project and add it to the Selected Projects list and click Add Distribution Partners.

System ID

Type in the system ID configured in the selected project on the selected Server in manual mode.
Alternatively, click Browse to work in automatic mode and the system ID is automatically added in the distribution participants entry once you select the project and add it to the Selected Projects list and click Add Distribution Partners.

Shared Path

Type in the path of the shared Project folder on the selected Server in Manual mode.
Alternatively, the share path automatically displays, if you have shared the distribution partner project’s folder, before adding it as a distribution Partner using Automatic mode.
NOTE 1: Make sure that you have shared the project folder with the user logged onto the operating system of the Server computer. Otherwise, while working in distribution, file transfer may not work properly.
NOTE 2: On a stand-alone Server, when setting the distribution among Local Systems (projects), for a distribution participant project where communication is set to standalone, you need to provide the local path of the distribution participant in the Shared Path field. For example, [Installation Drive]:\[Installation Folder]\[ Project Name].
Each time you sync, the local path of the distribution participant in the Shared path field is removed, and you need to manually provide the local path again.

Extensions button and the Extensions column

The Extensions button is enabled only when a new distribution partner project’s entry is added to the distribution participants list or when you select an existing distribution partner’s entry.
Click Extensions to add/remove EMs using the Select Project Extensions dialog box that displays.
After EMs are configured in the distribution partner project, the corresponding EM profiles are added automatically in the Profiles expander. Following values are displayed in the Extensions field:
— <none>: (default value) indicate that no EM is configured.
— <multiple>: when multiple EMs are configured. In the drop-down list, an EM that is configured in the project but is not installed, displays in red.
— <name of the EM>: when only one EM is configured.
NOTE: When configuring the distribution in Manual mode, select only those EMs that are configured in the selected distribution partner project. Even though you can configure any EMs, on sync, the distribution partner’s configured EMs are not changed. Moreover, you cannot work with such EMs of the distribution partner project, due to missing EM profiles, when working in distribution.

Browse

Use the Browse button to work in automatic mode.
When clicked, it opens the Browse for Distribution Partner dialog box. You can add distribution partner projects available on the selected Server in the current station domain or from the list of available network domains.
Additionally, you can also select the Server computer from the workgroup.

Add

When clicked, adds a blank row. You can manually enter the details of the distribution participant project that you want to set up in distribution.
NOTE: By default, a bi-directional distribution connection entry is added in the Distribution Connections expander setting up the fully-meshed distribution type.

Remove

This button is enabled only when a distribution participant’s entry (other than the Local System entry) is added to the distribution participant’s list either using manual mode or automatic mode.
Allows you to remove the distribution partner project’s entry from the Distribution Participants expander.

Sync

Click Sync to harmonize the distribution configuration details of all the distribution partner projects listed in the Distribution Participants and Distribution Connections expanders. Sync also allows you apply the Originator project’s distribution details to all the distribution partners.
NOTE: In a distributed system if the data master is changed you must synchronize the server manually.
During sync
— On the local system, it corrects any wrong configuration or duplicate entries of the distribution partner project by fetching and updating the details for each distribution partner project on the local system (originator project).
— On the partner system, it either adds a new entry for the local system (originator project), if not present or updates the existing entry.
NOTE: If the entries for the partner proxy port and partner dist port are present on the local system, then after sync on the local system, any duplicate entries for partner dist port and partner proxy port, configured in the Distribution Connections expander on the partner project, are removed and the fields remain blank on the Partner system.
Mismatch related to connection type are also removed when you click Sync on the Local System (Originator project).
This is because the entries are maintained only on one system in a distributed systems’ configuration.

Service Port

(Default value is 8888) In the Manual mode, provide the service port number configured using systems in SMC. Note that the service port for all the projects on the Local System is same.
In the automatic mode, when you add the distribution participant project, you need to provide the corresponding service port number, if it is other than the default 8888 in the Browse for Distribution Partner dialog box.

Browse For Distribution Partner Dialog Box

This dialog box allows you to select a Server computer from the accessible networks, in the domain or in the workgroup for configuring the distribution when you click the Browse button in the Distribution Participants expander. This expander becomes available when you select the Distribution participant check box available in the Server Information expander.

Browse for Distribution Participant Dialog Box in Domain


Browse for Distribution Participant Dialog Box for Local Projects in Domain


Browse for Distribution Participant Dialog Box for Local Projects in Workgroup


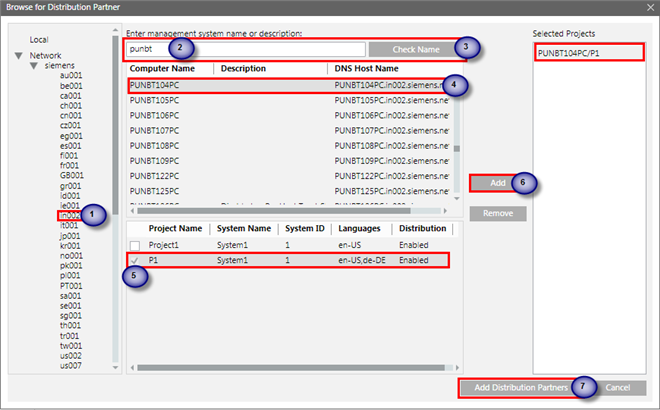
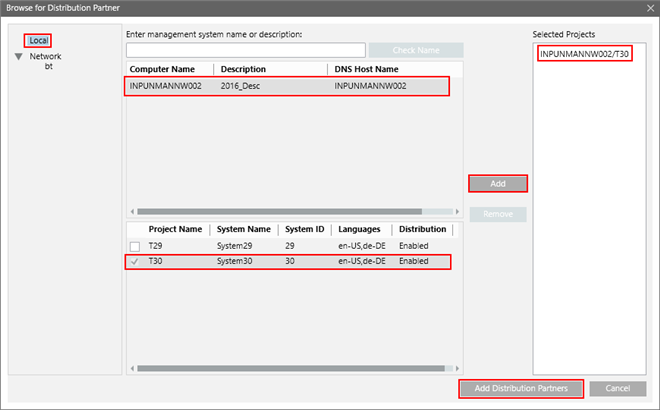
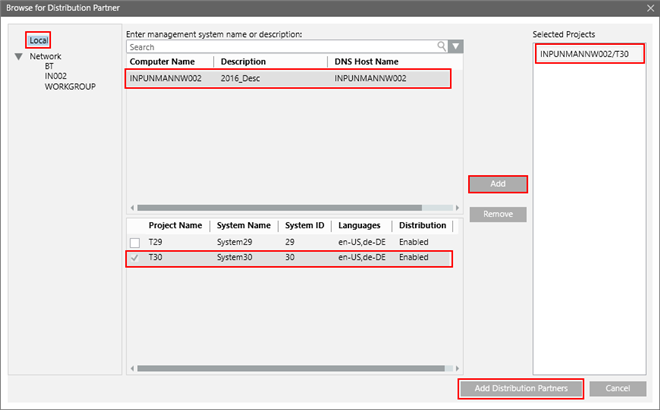
The Browse for Distribution Partner dialog box consists in the following elements:

Browse for Distribution Partner Dialog Box — Domain

Name

Description

Local

Network > Domains Tree View (applicable only for servers in domain)

Network > [Workgroup name]

When you select the Local node, current machine name and its projects are displayed.

A tree view that contains all available network domains. You can select the domain where the Server machine is located. The current user domain is selected by default.
NOTE: If you cannot see other domains in the network then this might be because you have logged in using a local Windows user in the domain environment. For working with distribution in a domain environment, it is recommended to use the domain user and not the local user.

Name of the workgroup to which the computers are linked in the network.

Check Name (applicable only servers in Domain)

Type the Server computer name into the Enter management system name or description field and click Check Name.
A list of matching Server computers available in the selected domain is displayed in the Filtered Server Computers’ List.

Get Projects

Available only when the Service port of the selected Server is other than the default 8888 or if the WCF service for the selected Server is stopped/unreachable, a message displays.
An additional field for providing the service port on the Server that you have provided displays. Click Get Projects to fetch the projects available on the Service port that you have provided.

Filtered Server Computers’ List

List view that displays the list of all the Server computers matching the search criteria for the selected domain.
Select the Server computer from the list to display the Available Projects list on the selected Server.

Available Projects’ List

Select the check box adjacent to the project that you want to add as a distribution participant. You can select multiple projects.

Add

This button is enabled once you select one or more project as distribution participant.
It allows you to add all the selected projects at one go to the Selected Projects column.
NOTE 1: You cannot add projects that have project languages or extensions configuration mismatch with the Originator project.
NOTE 2: You can add a project, for which the distribution is disabled. However, the distribution will not work for such projects.

Remove

This button is enabled only when the projects are added to the Selected Projects list.
It allows you to remove the selected project from the list of Selected Projects.
Additionally, it also enables the check box adjacent to the project that you have removed in the Available Projects list. You can de-select the project from the Available Projects list.

Add Distribution Partners

This button gets enabled when you have at least one project added to the Selected Projects column.
It allows you to add all the projects listed in the Selected Projects column as the distribution participants in the Distribution Participants expander.