Run the Command in the Command Prompt
- Run the following command in the Command Prompt:
“<Full path of the file Gms.InstallerSetup.exe>” /q <Full path of the silent Installation XML>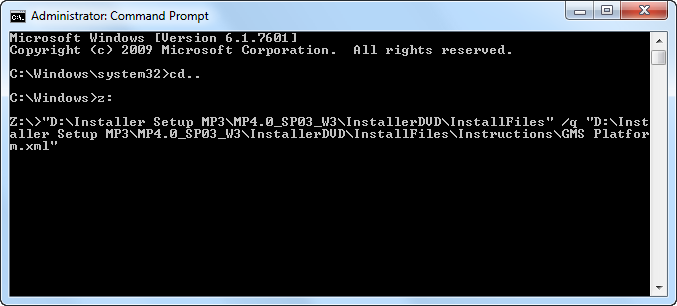
- An error message may display, if the operating system is not supported by Desigo CC . Click OK to abort the installation. Click View Log to open the log file, which informs you about the supported operating systems.
- The Desigo CC icon displays in the taskbar with the notification
Installation started.
As the upgrade proceeds, the taskbar icon tooltip displays in the Notification area. It informs you about the upgrade status including the status of the post-installation steps that are configured.
The taskbar icon also informs you of the automatic restart, if this was configured in the XML file. However, if the installation does not continue after the restart, you must run as administrator the following command in the Command Prompt:<Full path of the file Gms.InstallerSetup.exe> /q <Full path of the silent Installation XML>.
Alternatively, you can get approval from IT to change the UAC settings. (See Changing User Account Control Settings). - (Optional and applicable only for the selected XML file for a setup type, with tag ConfigureIIS = True and when no IIS components are already installed on your computer), on the already installed setup type IIS is installed and configured. However, if any component is already installed, a warning informing you to proceed with manual IIS configuration is added in the log file, having the extension _SILENT for silent installation, located at the path
[System drive]:\ProgramData\[company name]\GMS\InstallerFramework\GMS_Installer_Log.
In case when all required IIS components are correctly installed and configured, the silent installation proceeds with installation.
In both cases, when no IIS component is installed or when all IIS components are correctly installed and configured, the prerequisite ARR is installed, if not already installed.
Also, the currently logged-in user is added as a member of the IIS_IUSRS group.
The default website deleted from IIS manager and hence does not display in SMC. - The prerequisite, listed in the <SkipInstallation> section, for example Microsoft SQL Server 2022 - Express Edition, is skipped only when the value AskUser = 1 and Mandatory = 0 is configured in the GMSConfig.xml file.
If you have already installed V4.2 with Microsoft SQL Server 2014 - Express Edition, you do not need to uninstall it. During upgrade Installer upgrades it to the latest version, Microsoft SQL Server 2022 - Express Edition.
However, in V4.2 if you have skipped the Microsoft SQL Server 2014 - Express Edition installation during installation or used your own SQL Server, still in V4.2 required SQL Client components prerequisites are installed. Now, during upgrade, Installer upgrades to required Microsoft SQL Server 2022 - Express Edition and installs/upgrades required SQL Client components prerequisites.
You can also skip Microsoft SQL Server 2022 - Express Edition. Note that the required SQL Client components prerequisites are still upgraded/installed.
- After the silent upgrade and configured post-installation steps are executed, right-click the taskbar Desigo CC icon to display the following context menu options:
Exit: Click this menu to exit the taskbar. Otherwise, the icon is removed from the taskbar notification area 15 minutes after the installation is completed.
View Log: Click this menu to open the Installer Log file.
NOTE: During upgrade, installation of hotfixes or quality updates, if you encounter any errors or warnings, for example, regarding prerequisites, extensions or post-installation steps, digital signature validation, see Consistency Check Scenarios. - (Optional and applicable only for post-installation step – License Activation) The licenses are upgraded and activated based on the license files (.lic) available and/or Activation/Entitlement IDs specified. You can verify license activation of these files in LMU.
For already active licenses, expired licenses, invalid file format or missing files, and so on a notification is displayed for the notification area icon. For more information, refer to installer log file located, having the extension _SILENT for silent installation, located at the path
[System drive]:\ProgramData\[company name]\GMS\InstallerFramework\GMS_Installer_Log. - (Optional and applicable only for post-installation step – Project Setup) The already existing active project is upgraded, activated and started by default.
If the History Database was linked to the previously active project, it is also upgraded along with the Long Term Storage, if any.
All the existing web sites and web applications are also upgraded, even if upgrade of the any of the existing web application fails. The already existing certificate is used for securing the communication between the Windows App client and the web server (IIS).
Finally displays the logon dialog box for specifying the credentials.
If there is no already existing project, HDB and website/web application available for upgrade, then the JSON file is referred to for the creation of the project, History database and website/web application. Note that even if the HDB creation/upgrade fails, the post-installation continues with the next step. In that case, you can re-run the post-installation step for HDB creation/upgrade.
For the configured an existing project’s Pmon user/web application user, if the password is expired, then the web application upgrade fails and you must manually update the web application using SMC.
For more information, refer to installation log file, having the extension _SILENT for silent installation, located at the path
[System drive]:\ProgramData\[company name]\GMS\InstallerFramework\GMS_Installer_Log.
For any invalid website/web application configuration, missing IIS configuration, invalid domain user and so on, a notification is displayed. For more information, refer to the SMC log when required at the following path
[Installation drive]:\[installation folder]\GMSMainProject\log. - (Optional and applicable only for post-installation steps of other extensions) The post-installations steps of other extensions, when correctly configured, enabled (modified the .txt file to.xml) are executed as well successfully.
- (Optional and applicable only for Quality Updates and Hotfixes) The patches for prerequisites, platform, mandatory extensions, and the non-mandatory extensions, as applicable are upgraded. For any errors during the patch installation, refer (_ELOG) file.

NOTE 1:
During the silent upgrade, the Installer ensures that all parent extensions of the configured extensions are upgraded, even if they are not explicitly mentioned in GMS Platform.xml file. Moreover, a mandatory extension and its parent extension (mandatory or non-mandatory) even if they are not explicitly mentioned in GMS Platform.xml file also get installed.
To configure the extension from other location than the distribution media, you need to configure the path of those extension in the attribute <ExternalEMsPath> of the GMS Platform.xml file.
If there are missing extension during Silent upgrade, the silent upgrade will abort and the error message regarding missing extensions are available in the Silent Installation Log file.
NOTE 2:
In case any already installed extension is not present in the software distribution, then silent installer will abort the upgrade with the fatal error.
NOTE 3:
If there is a prerequisite conflict, the Installer, by default, takes the action (Install/Update/Skip/Abort) by selecting the default set option as in the custom installation and resolves the conflict automatically. In case of Abort, please see the Installer Log.
For example, if a higher compatible version of the software is installed, the Installer skips the installation of the prerequisite.
NOTE 4:
If a lower compatible version is installed, then the Installer upgrades the prerequisite.
However, for a non-mandatory prerequisite, the Installer completes the installation, but fails to install the non-mandatory prerequisite and informs you with a notification in the task bar notification area.
NOTE 5:
If a lower incompatible version is installed, by default, the Installer installs the prerequisite.
NOTE 6:
If the installation fails, you must click Exit in the context menu that displays when you right-click the taskbar icon.