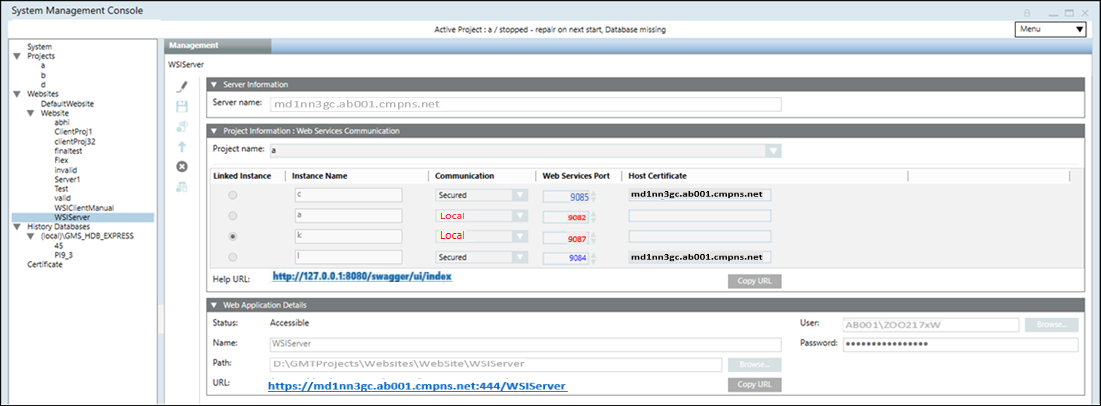
Web Services Application
A Web Services application, linked to a communication instance in your project, is required to support web applications such as Flex Client or Advanced Reporting, as well as the mobile app client. Web Services applications are created under websites in SMC. The URL of the website determines the URL of the Web Services application.
- For a local IIS deployment, do these steps on the Desigo CC server station.
- For a remote IIS deployment, do these steps on the separate Client/FEP station that hosts the IIS server.
- A website is configured in SMC.
- A web services communication instance is configured in the project.
- In SMC, select Websites > [website], and in the toolbar select Create Web Services Application.
(or, to modify an existing web service app, select it and click Edit.) - If you are working on the Desigo CC server station (local IIS deployment):
- The Server name is a read-only field, showing the name of this computer.
- Select the Project name, and underneath it shows the configuration done previously in the Web Services Communication expander of the project.
- Select the Instance to use, if more than one was configured in the project.
NOTE: In this case, you can use an Instance set to Local (without certificates). - If you are working on the Client/FEP station (remote IIS deployment):
- Next to the Server name field, enter the host name of the Desigo CC server computer, or use the Browse... button.
- Click Projects... and, from the dialog that opens, select the project for which you configured communication instance for web services, and click OK.
- The Project information: Web Services Communication expander is populated with the information pertaining to the selected project.
- Select the communication Instance to use, if more than one was configured in the project.
NOTE: In this case, you must select a Secured instance (with certificate). - In the Web Application Details expander:
- Assign a Name to the web service.
- The user/password fields are prepopulated with those of the website user.
- Click Save
 .
.

You can test the web service using the links:
- The Help URL link will show a "Welcome to the Web Service Interface" page.
- The URL link will show a message "URL not supposed to be displayed in a browser but entry point for API access".