Configure the Rotator Control Properties
Complete the procedure below to configure the Command Control properties of the rotator command control you have drawn on your graphic. The following instructions are just one example of how a Rotator command can be configured.
Scenario: You want to command and view the Present Value of a data point using a Rotator command control on your graphic, and an Analog Output .Present Value data point property is used.
- You have a Rotator command control with a thumb drawn on the active graphic.
- From the Property View (Rotator properties), expand the Command Control properties.
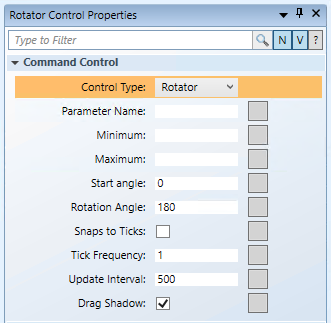
- In the Parameter Name field, type the data point’s Parameter name obtained from the Models and Functions Command Configuration table. This field is case–sensitive. This property will be the same Parameter property later defined in the Command and Navigation section.
- For this example, type Value.
NOTE: This property will be the same Parameter property defined later in the Command and Navigation section. - In the Minimum field, type the lowest value the rotator will command to.
- For example, type 0.
- In the Maximum field, type the highest value the rotator will command to.
- For this example, type 100.
- In the Start Angle field, type the angle value that represents where the Minimum value starts on the rotator.
- For this example, type –60.
- In the Rotation Angle field, type the value that represents the amount (in degrees) the rotator will rotate from the start angle. The default value is 180.
- For this example, type 120.
- The Snap to Ticks check box allows the Rotator to snap to values in increments provided by the Tick Frequency Property.
- For this example, select the Snap to Ticks check box.
- In the Tick Frequency field, type a value to specify the interval at which ticks are separated on the rotator. The Target’s value (.Present_Value, in our example) changes based on its most recent value and according to the Tick Frequency value.
- Select the Snaps to Ticks check box to enable the thumb to incrementally move to the closest tick when the position of the pointer changes.
- In the Tick Frequency field, enter the value of the tick frequency. For example,10, 20, 30, or 2, 4, 6, and so on. The tick marks start at the Minimum value and continue until the value of the Maximum value is reached.
- For this example, type 10.
- In the Update Interval field, type a value in milliseconds that specifies how quickly the value is updated as the thumb moves along the rotator. The default value is 500.
- For this example, leave the value as the default. The rotator command will update every .5 second as you drag the thumb.
- Select the Drag Shadow check box to view the thumb shadow when the thumb moves. Behind the moving element, the original thumb position is semi-transparent. This allows the actual data point value to always be visible. This property is enabled by default.
- You have configured the Rotator Command Control properties.