Create a New Project in Automatic Configuration Mode on a Client/FEP
Automatic configuration mode is the default project creation mode on the Client/FEP. In this mode, the Manual configuration check box in the Client Project Information expander is cleared.
While creating a project in automatic configuration mode, the Client/Server communication mode and the Certificate type are automatically set to match those of the selected Server project.
You can establish a secured communication between the Server project and the Client/FEP project. For this you either use file (.pem file) based or Windows store based certificates. The following procedure describes the Client/FEP project creation using Windows store based certificates.
On the Server, ensure the following:
- For Windows store certificate:
- the root certificate must be imported in the TRCA store of the Local machine certificates store in the Windows Certificate store.
- only certificates with RSA signature algorithm are supported. CNG certificates are not supported.
- For .pem file certificates, the root certificate must be available on the disk of Server as well as Client/FEP machine.
- Share the Server project folder that you want to connect to with the logged-on user of the client/FEP operating system before creating the project.
On the Client/FEP, for the Windows store certificates, you must ensure the following:
- The same valid root certificate as on Server project you are about to configure in the client/FEP project must be imported in the Trusted Root Certification Authorities of the Local machine certificate store.
- The host certificate (along with a key,) that you are going to provide for Secured client/server communication must be created using the root certificate on server project. The host must be imported in the Personal store of the Windows Certificate store.
- In the SMC tree, select Projects.
- Click Create Project
 .
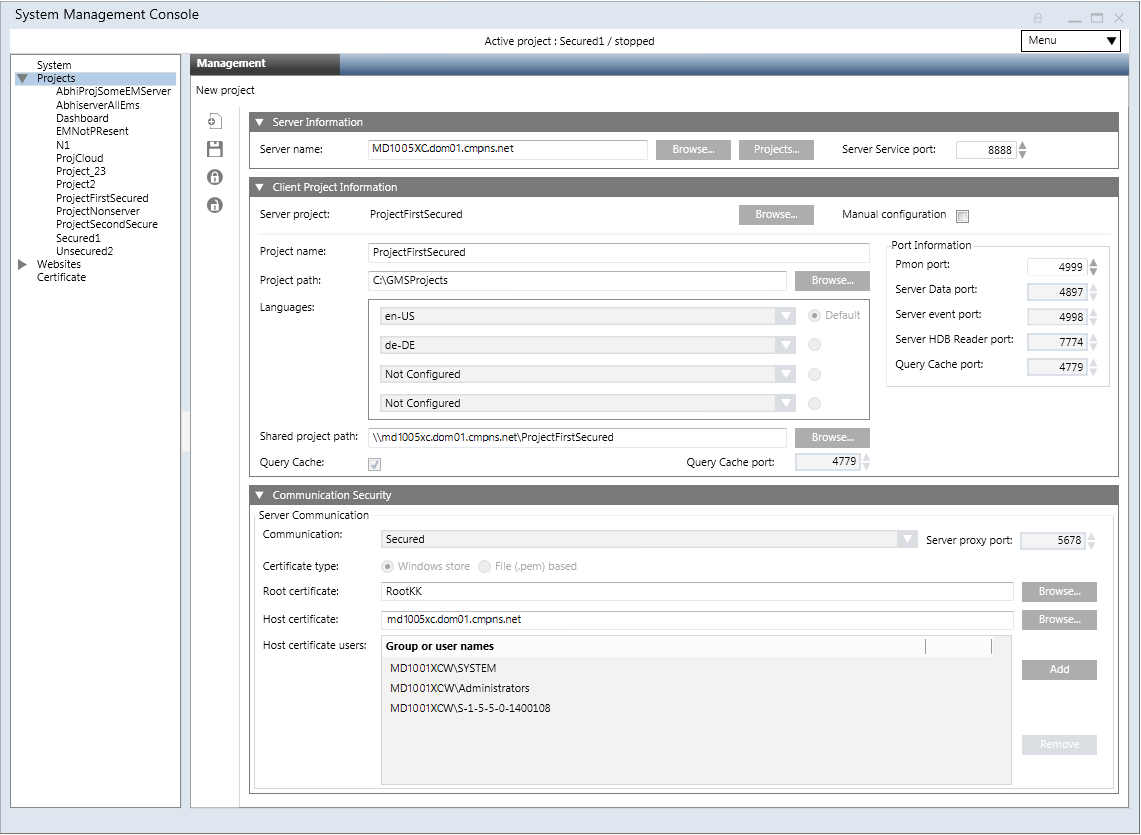
. - In the Server Information expander, do the following:
a. In the Server name field, type the Full computer name of the server or click Browse to locate and select the server using the Workstation Picker dialog box.
NOTE: If you get a message stating that the server is not available, see the troubleshooting steps.
c. Click Projects to browse for Server projects using the Project Information dialog box. In the Project Information dialog box, proceed as follows:
d. Select a Server project that you want to connect to.
NOTE: It is recommended to enable the secure communication between server and Client/FEP. To do this, you must select a server project configured for secured Client/Server communication. Note that the Stand-alone and Unsecured options are also available. If you choose a Stand-alone server project, no communication is possible between Server project and Client/FEP project. For an unsecured server project, the communication is unsecured (without certificates) and hence not recommended.
e. Click OK. - The details of the selected server project, including the name of the project on the Client/FEP, Project path, port numbers, language, and the Shared project path, if the project is shared, and the Query Cache if enabled along with Query Cache port number, are added in the Client Project Information expander.
- The default security details are modified and are set to match the security configuration details of the selected server project.
- In the Client Project Information expander, do the following:
- (Optional) Edit the Project name, if a project with the same name already exists in the SMC tree.
- (Optional) Edit the Project path.
- (Optional, and not required when the Server project folder is shared) Displays the shared project path of the selected Server project, if the Server project folder is shared. However, you can edit this by typing in a new path or browsing for the shared project folder.
NOTE 1: When you save the project, the project path is not validated. Therefore, you must provide the correct shared project path.
NOTE 2: You must enter the server name before browsing for the shared project. Otherwise, a message displays.
NOTE 3: You can create a client/FEP project without providing the shared project path. However, in this case, the very first project that you create on the client/FEP will no longer be activated automatically. The shared project path is mandatory for activating the project. - In the Communication Security expander, do the following:
a. Browse for a root certificate from the Windows store using the Select Certificate dialog box, or from the disk using the Open dialog box, depending on the certificate type. By default, the default root certificate on the Client/FEP displays in the Root certificate field. Make sure that you select the same root certificate that was used for secured Client/Server communication on the Server project.
b. Browse for a host certificate from Windows store using the Select Certificate dialog box, or from the disk using the Open dialog box, depending on the on the certificate type. The host certificate and the host key (only for File .pem based certificates) must be generated from the root certificate you provided. If you select the host certificate from the User store, the Add button is disabled. Since the User store is local to a user account on the computer, you cannot add users to the Host Certificate User list.
c. (Required only in case of File (.pem) based certificates) Browse the host key from the disk.
d. (Available only for the Secured client/server communication type and Certificate type Windows store) Add Host certificate user to the list of users, if required.
NOTE 1: Only users and group listed for the selected host certificate can launch the Desigo CC Client on the Client/FEP.
NOTE 2: Even if the logged-on user of the Client/FEP operating system is a member of the Administrators group and has rights on the private key of the host certificate provided, you must still explicitly assign this user rights on the host certificate’s private key by adding the user to the Host Certificate User list. - Click Save
 .
. - A warning message displays warning if the root certificate provided on client and Server projects do not match. You must ensure that the root certificate is the same as that of the Server project. Otherwise, the Desigo CC client does not launch, and you must do the following:
- Click Cancel.
- In the Root Certificate field of the Communication Security expander, browse for and select the same root certificate as on the server.
- Click Save .
- The data entered while creating the project is validated and saved.
- The new project node is created as a child under the Projects node in the SMC tree. Although it is in the
Stoppedstate, you can edit, activate, delete, or start it.
- A project folder structure is created with subfolders and files at the specified path.
- The project config file is updated with info such as ports, languages and so on.
- In case of file (.pem) based certificates, the root and host certificates and the host certificate key file used for secure communication are copied to the path ..\[ProjectName]\Config and config file are updated. In case of Windows store certificates, only the config file is updated.
Special Considerations when Applying Security for Closed Mode Configuration
- You must provide permissions to the closed mode user (GMSDefaultUser) on the private key of the host certificate configured for the client/server communication. This must be done even if the closed mode user (GMSDefaultUser) is a member of the Administrators group and that Administrator group has rights on the private key of the host certificate.
- If you are configuring closed mode on the client/FEP, then you must also provide file-system access rights to the GMSDefaultUser of the client/FEP on the project folder on the server.