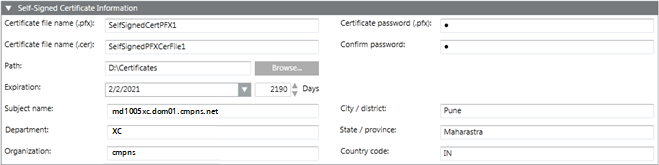
In the Self-Signed Certificate Information expander, enter the following details: a. Certificate file name (.pfx). b. Certificate file name (.cer). c. Certificate password (.pfx). d. Click Confirm. e. Browse for the location to store the self-signed certificate on the disk. f. Set the expiration (validity period) duration in days. By default, the certificate expires after 2190 days. g. Enter the following information about the Subject: — Subject name (default) the Full computer name of the host machine, for example, ABCXY022PC.dom01.company.net. However, you should change this to the full computer name of the host machine, where this self-signed certificate will be imported or used. For example, you can change the default subject name to the full computer name of the host machine where the Web application will be hosted. NOTE 1: The self-signed certificate is used as the default certificate while creating a Website/application. To create a Website, the certificate that you enter must be the full computer name. NOTE 2: It is recommended to create only one self-signed certificate with the full computer name. If you create multiple self-signed certificates with the subject name as the full computer name, the Issued to and the Issued by fields of all these multiple certificates will be same and it will be difficult to identify which certificate to use. However, you can identify the certificate using the Thumbprint field of the Details tab, when you view the certificate details. — Department — Organization — City/District — State/Province — Country Code (only two characters). NOTE 3: It is recommended to create a new certificate if the machine name is changed, each machine name must have a unique certificate, you can import and set the certificates as default.
Click Save.
The data is validated, and the two new self-signed certificate files, one with .pfx extension and one with .cer extension, are created at the specified location on the disk. The self-signed (.pfx file) is used for importing the self-signed certificate in the Windows Certificate store when securing the communication between the server and the remote web server (IIS) using Communication Security expander – Web Server Communication.
 and select Create Self-Signed Certificate (.pfx)
  .
. .
.